TOTAL IMPACT: WHY AND HOW?

Between what you have to say and what your audience perceives as your message, there is a significant variable that can help or hurt you – your style.

How you present is much bigger than what you have to say.

  1. Close to 56% of the impact from an oral presentation is visual – facial expressions, meaningful hand gestures, body movement, and one-on-one eye contact with individuals in the audience play a significant role.
  2. 36% of the impact comes from the sounds you make: your tonality and vocal variety using changes in pace, projection, pitch, and pauses are empowering.
  3. What does it leave for the content? It is 8%.

Q: Does what you say matter if content weighs only 8%?
A: The answer is yes, of course – your belief, heart, passion, conviction, preparation, depth of knowledge, and credibility in what you have to say make the other 92% possible. So, the quality of ideas, depth of understanding & learning, and sound preparation are essential.

Q: If you are passionate about your topic and have prepared the content well, would that help with the other 92%?
A: Yes, it is pivotal to your success and a great start. However, it isn’t automatic: you still need to work for 92% so that your audience receives the message in your intended spirit.

Body Language

Body language – what you convey with posture, tonality, voice inflections, facial expressions, eye contact, gestures, and movement – plays a crucial role.

VIDEO ONE: Helpful tips for incorporating body language in your presentation.

The following are ten ideas we discussed in class through various workshops. Think about them, try them, explore them, and play around with them at toastmasters. You will develop your style over time. Ask one of our coaches if you missed our workshops and need a refresher on any of them.

Emphasize specific words in your presentation – words you think are critical or pivotal for your message.

A few tools:

  1. Stretch technique: Stretch a word in the sentence to add meaning or to emphasize.
  2. Vary your projection to highlight a word – remember that it doesn’t always have to be louder. Sometimes lowering your projection can also draw your audience to your point.
  3. Have a long pause before or after the word.
  4. Lower your pitch while saying a specific word. It is an effective technique. Work on it.

Action item: identify 5-7 words, highlight them in your prep, and practice saying them out loud to try and explore these techniques.

Practice, practice, and practice.

Stair-steps technique: imagine and practice your tonality going up or down the stairs (rather than staying flat all the time.)

Action items:

  1. When you start developing a point or are setting a stage for it, practice your tonality of “going up the stairs.” When driving a key takeaway, practice your tonality of “going down the stairs.”
  2. Try the opposite of #1 on the list. While setting the stage for a point, practice your tonality of “going down the stairs.” While delivering a key takeaway, have your tonality “go up the stairs.”

Lower your pitch when you articulate the essence of an idea or a key takeaway.

Action item: Try combining variants of pitch variation and stair-steps technique. Examples:

  1. Your tonality can go up while the pitch gets lower, or your tonality and pitch can both go high in tandem.
  2. Your tonality can go lower while the pitch gets higher, or your tonality and pitch can both go lower in tandem.

Engage in one-on-one eye contact with individuals in the audience. You make eye contact with an individual long enough for a meaningful exchange. I think 2-3 seconds is all you need for eye contact, and then switch to the next person. When you practice speaking like this, public speaking is one-on-one speaking to all in the audience, one person at a time. It will do wonders for your comfort level and ability to reach and engage your audience and open floodgates to unlock facial expressions, hand gestures, and emotional engagement.

If you sense they aren’t comfortable with the eye contact, move away from them to a different person.

Action item: Identify five individuals in the audience and have one-on-one eye contact with each of them at least once. Visualize in your mind doing it, and explore/try it. Tell your friends maybe you are doing that and seek their feedback after the presentation.

Avoid unnecessary movements and pacing of any kind: they drain energy from your presentation and dilute your impact.

Be aware of nervous expressions such as putting hands in your pockets, nodding your head excessively, using filler words like um and ah too often, pacing back and forth, or rocking from one side to the other. Learn to control these mannerisms. They can distract your audience and sap energy from your presentation.

Action items:

  1. Ask your evaluator, friends in the class, or coaches to look for those at the toastmasters session and give you feedback when they see distracting movements.
  2. Ask a fellow toastie or one of the coaches to record your presentation and watch it at home. Practice what you want to eliminate a few times and give the presentation again. It is the fastest way to learn and improve.

Hand gestures:

  • Avoid folding your hands, keeping them in your pockets, or keeping them behind you.
  • Keep your hands by the side or above waist level. Avoid moving them without reason. You will develop your style over time.
  • Put your words into action using gestures.
  • Make your gestures wide when you use them.
  • Think of integrating a few gestures in your presentation and practice them for prepared speeches.

Action item: Think of five instances in your presentation where you are developing an important point. Explore and play around using hand gestures in those moments and practice repetitions of the sentence to try these hand gestures. Watch VIDEO ONE above again. It has some ideas to identify and incorporate hand gestures in your presentation.

Whether it is an impromptu table topic or one of your points in a prepared presentation – develop the message in your own words as it flows naturally (with table topics, you don’t have a choice anyways.)

Avoid reading your message from paper or a phone. Bring handwritten flashcards with only a few words written in big fonts – use them as reminders of what is next in your presentation.

Thinking on your feet and allowing the message to flow in your natural words plays a pivotal role in developing the body language and maximizing the impact & reach with your audience.

Techniques that might come in handy for you while developing a point.

  1. PREP: Point – Reason – Examples – Point
  2. Point – Story – Point
  3. Develop two sides to a question or a viewpoint, and then close it with your takeaway

VIDEO TWO: Techniques to develop a point.

Take time to think on your feet, and be comfortable in silent moments when you speak.

When you pause, your audience is waiting, trying to anticipate what comes next. Pauses are powerful. Incorporate them in your presentation. Get used to them. Enjoy them. Practice them.

Action items:

  1. There is a beautiful thing at the end of every sentence – the period. Use it to inhale and pause.
  2. Avoid connecting sentences with and, so, and so, but, etc. – it will drain your energy, take you away from your natural breathing pattern, and limit your ability to think. It also makes it difficult for your audience to follow you.

Breath. Remind yourself to let breathing happen.

Use the breathing technique we practiced several times in our classes. Exhale as you speak so that if you put your palm in front of your mouth, you will feel a continuous puff of air on it while speaking. Visualize and observe your tummy going in as you speak. Air is the fuel for your sound, and you are using it as you speak.

Pause and inhale at the end of every sentence to refuel.

Action item: Practice saying a paragraph from your presentation out loud and exaggerate pauses to take deep breaths.

Once you play around and become comfortable, ask your coaches about body movement. You can move around with purpose, and it can add impact.

In the meantime, if you’d like to move from one spot to another, take at least two and a half steps (and not just one or half a step), stay in the new sport for at least 30 seconds, and move again if you like.

Again, focus on the first nine ideas of this article first.

THEME DEVELOPMENT WITH PREPARED SPEECHES

How do you prepare for your speech presentation? What can you do to have a clear direction for your message?


END GOAL IN A NUTSHELL – QUICK CHECKLIST FOR YOU

  1. Do you have a clear takeaway for your audience that you can describe in one sentence? It’s #3-a in the list below.
  2. Can you describe to yourself in less than a minute what you are aiming to develop using your speech?
  3. What is your theme with the message?
  4. How will the speech title help you reinforce the theme? (STEP # 6 in the list below)


A CLEAR IDEA: TWO OBJECTIVES

This tool is organized with two objectives in mind:

  1. What is your main idea with this speech presentation? Make it clear to yourself.
  2. Once it is clear to you, your presentation’s goal should be to create that idea in your audience’s minds. What would it take for your audience to get your picture? What would it take for your audience to see it from your perspective?

Chris Anderson, Head of TED, has described it so powerfully in this video:


We want to consider it in the context of speech presentations we prepare and deliver at our Toastmasters meetings.


>> DOWNLOAD PDF OF THE STEPS


STEP # 1: SPEECH TOPIC – PROJECT OBJECTIVES

Think about your speech project objectives and how a particular topic can help you achieve them.

See more about speech topic selection in this article (Click this link).

Write down how the topic can help you with the project objectives in a sentence or two. If you need help coming up with speech topics, ask coaches.

STEP # 2: YOUR EXCITEMENT FOR THE SPEECH TOPIC

  • What prompted you to select this as your speech topic?
  • What do you like about it?
  • What makes you think about it?

Answer it in one or two sentences. The idea is to keep the passion, excitement, or concern behind the speech topic in mind while preparing for the presentation. Think about it and write down your first cut at the answer as you start the process; it will help you.

If a different answer emerges for you while preparing for the speech, revise it.

STEP # 3: DEVELOP YOUR SPEECH OUTLINE

The following components can help develop a clear point. You don’t necessarily have to develop them in the same order.

3-a: TAKE AWAY FROM THE PRESENTATION

What is your key takeaway from this presentation? Or, what is the main idea of this speech? Answer it by completing one of the following two sentences.

  1. I want my audience to
  2. I want to

Examples:

  1. I want my audience to understand how nanotechnology is impacting our lives.
  2. I want to explain how nanotechnology is impacting our lives.
  3. I want to inspire my audience to learn more about nanotechnology.
  4. I want my audience to see how my vacation trips help me understand different cultures and ways of life.
  5. I want my audience to appreciate the thrill I had from the different places I visited.
  6. I want to show how much I enjoy spending time with my family on vacation.
  7. I want my audience to understand the importance of maintaining good posture.
  8. I want to describe how basketball is making a difference for me.
  9. I want to share what earning the 3rd-degree black belt test at Taekwondo means.
  10. I want to inspire my audience to join the Boy Scouts (or the Girl Scouts).
  11. I want my audience to see how the Boy Scouts can help them become better leaders.
  12. I want to show how I enjoy playing video games.
  13. I want my audience to understand how video games positively impact youth.

Note: The examples in the above list – #2 & #3, or #4, #5 & #6, or #10 & #11, or #12 & #13 – are related but have a different message, and so would be very different speech presentations.

3-b: BRAINSTORM IDEAS

Jot down all that comes to your mind – a list of points or paragraphs – however it flows for you. While doing it, if your takeaway (step # 2) changes, revise it as you see fit.

If you are used to writing paragraphs, what would be the idea that each paragraph might have developed?

3-c: PICK AND CHOOSE IDEAS – SEQUENCE THEM

Start with your presentation’s main idea or takeaway (#3-a)

Which of your ideas from #3-b would help?

Which of your ideas from #3-b would NOT help? Move them to the side.


String together what you have chosen to keep or include in an outline like the following:

Part I – Opening

  • Begin with something that will capture the audience’s attention or create intrigue for your message.
  • Introduce your topic.
  • Develop a brief transition statement to introduce what you will discuss next.

Part II – Main Body

  • Main point 1 – transition
  • Main point 2 – transition
  • Main point 3 – transition

Part III – Conclusion

  • Reinforce your overall theme.
  • Close with impact.
  • Food for thought: what would help me make the conclusion memorable for my audience?

Developing your speech outline can be an iterative process. Feel free to go back and revise it while you prepare and practice.


STEP # 4: SPEECH OPENING

Try your speech opening out loud; feel it. Revise it in the process so it flows naturally for you. Practice it at least a few times. Bring energy and enthusiasm to your speech opening.

If you need to revise the speech theme or outline while practicing the speech opening aloud, do so. It’s totally okay and normal if you feel like changing the speech while trying the opening – you aren’t the only one – you aren’t the first one.

Practice presenting your speech opening at least three times, and use our engagement techniques (more on it is in this link – click on it.)

STEP # 5: SPEECH CONCLUSION OR ENDING

Please think of how this topic can relate to people in your audience personally, or what they can use it for themselves, or a lasting impression you would like to leave, so that they will remember your speech.

Try your conclusion out loud; feel it. Revise it in the process so it flows naturally for you. Practice it at least a few times.

If you need to change the speech outline while practicing the opening and conclusion, that is okay and recommended. Speech preparation is an iterative process.

STEP # 6: SPEECH TITLE

Questions or ideas to consider to select your speech title:

  • Avoid giving away your speech with the title. You want your audience to listen to your presentation to see what it is. A speech title, in that regard, can be very different from the title of a written essay or a book. Using the title to summarize what is in the article for a written piece probably makes sense. A speech title, on the other hand, can be a tool to intrigue your audience.
  • The title could be the word(s) for a key idea or theme you develop in your speech.
  • The title could be the surprise element or a climax you develop in your speech.
  • Maybe weave the title into your conclusion.
  • What is a critical idea for the audience to understand your perspective? Make it your speech title.
  • Tie the title to your crucial takeaway for them. It will help you reinforce your speech’s purpose and drive the point home.

Action Item: Write down your idea and angle for the speech title. What is your speech title, and what was your thought process to decide on it?

STEP # 7: YOUR OVERALL THEME WITH THE PRESENTATION

  1. Think about steps #1 and #2 one more time. What excited you about this speech topic? What is your intended takeaway from it?
  2. Do steps #3, #4, #5, and #6 help you achieve your speech objectives? Revise them as required.
  3. Make sure to be clear and explicit about where you are going with your speech title. If your audience couldn’t understand the meaning of your speech title from your presentation, you missed an opportunity to make a strong connection and make your message memorable.

Split your preparation over multiple days; clarifying your theme and message will work wonders.

Action Item: Write your theme in one or two sentences in this step.

STEP # 8: PROJECT OBJECTIVES (AGAIN 😄)

Think about your speech objectives one more time. Practice.

For example:

  1. If it is about using body language, consider when, where, and how you can integrate it into your delivery.
  2. If it is about developing vocal variety, practice emphasizing keywords using the “stretch” technique, delivering dialogue in your speech, varying tonality, using pauses, changing projection, etc.
  3. If it is about persuading or inspiring your audience, practice emotional engagement and bring out your connection to or passion for the speech topic.
  4. If it is about using descriptive language, prepare and practice vivid descriptions, metaphors, similes, rhetorical devices, and other techniques.

Action Item: Share in 3-5 sentences your plan to implement ideas for the project objectives.


>> DOWNLOAD PDF OF THE STEPS


NOTE ON VISUAL AIDS

  1. Have a clear plan for how you think the visual aid will support your idea. Why and how will a visual aid add value? It will probably complicate your life and dilute your presentation if you can’t clearly explain why you need it.
  2. A PowerPoint or Keynote slide presentation isn’t the only visual aid option. Bring a project you might have worked on if the speech concerns that. Use an easel with a chart and write/draw/develop it as you speak, like a classroom chalk talk. Bring something printed for everyone in the audience, so they can see and follow it when you talk.
  3. Q: “What if I use slides to list my main points to develop?”
    A: I’d use it only if you think it will help you reinforce your message for them. If you use visual slides to remind yourself what is next, a much easier and simpler thing is to bring small handwritten flashcards. It will probably save you time and effort. It will also help you focus on your delivery.
  4. When you use PowerPoint or Keynote, remember that you are the presenter, not the TV screen. TV and your slides are tools to help you, not replace you. Avoid reading word-for-word what is on your visuals. Or else your audience can get bored.

Steps to Prepare and Tell your Story

STEP # 1: What is your idea?

How did someone or something make you happy, sad, ecstatic, frustrated, or excited? Is it an event or an experience you might have? Is it from a movie you watched or a book you enjoyed reading? Or are you writing your own fictional story?

Why or how is it memorable for you? Why would it be an exciting story to tell?

Write down the details. That will be the crux of your story.

Describe your time and place in detail. Plan to take them there using your story.

STEP # 2: Start and end of your story

What is your starting point of the story? When does it end? If your account doesn’t have an ending, then conclude it maybe with a question mark. You can also start your story with a finish and then jump to the start of the story. Each story is different, and the vital thing to understand is what will get the audience interested right away.

STEP # 3: A story moves forward by specific moments, instances, or characters. What are those in your account?

What are specific moments or experiences, or incidences that have made a strong impression on you? Zoom in to those moments while developing your story. “Take” your audience there, make them feel, and see and hear what you did in those instances.

Tips for the zoom-in moments:

  1. Slow it down while taking your audience there.
  2. Use vivid descriptive language. Help your audience visualize it using the words.
  3. Another technique – play a dialog between the characters. It is a proven technique to help your audience feel your story.

STEP # 4: Expressions

The story is acting out the events. The more expressions you add, the better it would look. The expressions are mostly of characters, but you can act out people or events that help get your point across to the audience as a storyteller.

STEP # 5: Practice your delivery.

You can practice in front of a mirror, with family, with friends, or at Toastmasters.

Make storytelling an emotional experience. Invite your audience to see and feel it with you. Use vivid descriptive language, or dialogs, or specific details, etc. Tell your story multiple times at Toastmasters. We are here not just to enjoy new ideas and stories but also to learn how to develop them. When a speaker repeats a project, everyone gets to see the process of how to refine and strengthen your speech delivery.  

Note: Take genuine interest to see how others are working on their story; it will help you learn much faster.


> DOWNLOAD TOASTMASTERS STORYTELLING PROJECT

It opens in a new tab when you click on the above link. The project has insightful ideas on both crafting a story and what can help with effective delivery.


Once you tell a couple of stories, please start thinking about the following ideas when you craft your narrative (not to worry about it till then.)  

ONE: The protagonist in the story overcomes something or someone or has a shift in perspective. It changes them in some way. What is that in your account?

  • If it is a personal story, it is you that changes. How did the story change you?
  • The protagonist in your story can also be someone else. In that case, how did he or she change from inside in your account? What is the impact of that on you personally, or what makes it an intriguing story to tell for you?

TWO: Another way to look at it is that there is some tension, stress, friction, anxiety, discomfort, or surprise for the protagonist. Their pressure plays out and gets resolved with the story. It doesn’t need to be something serious or tense; it can be something fun, humorous, thrilling, or exciting, too. However, there is something beyond the protagonist’s control or comfort zone that plays out, creating climax in your story.

Examples:

  • I got anxious from heights and took on the adventure of rock climbing to be with friends. The story plays out to some resolution that can be fun, full of laughter, or a relief.
  • My parents said no, but we decided to take on the thrill of escaping and doing it on our own anyway.
  • I love playing video games. However, getting to the next level on this particular game was so challenging. I decided to take that on with my friends to impress them.
  • Halloween trick-or-treating is so fun. However, this year we had this friend joining us that a little out of control. Or, we had this friend that created a mess with something. Or, we had this friend that is irritating in some way. 
  • I wanted to make it to my high school team. However, something seemed daunting or overwhelming, creating a mental block.
  • My vacation trip was fun. However, during the trip, there is something with parents or friends who started annoying me, surprised me, or made me feel embarrassed or wanted to escape.
  • When you tell a story about someone else or a movie or a book, pick your protagonist and one thing about them that you think is challenging in some way. Let that play out to a climax in your story.
  • Life is regular and routine. An event or an experience changes it, leading to pain, discomfort, worry, tension, surprise, unexpected fun, thrill, excitement, humor, etc.

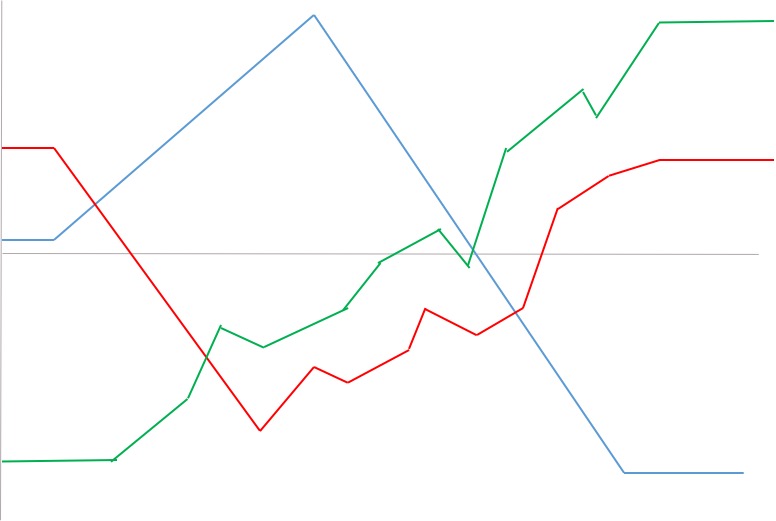
THREE: Story should have a shift, a variation, a twist, or a surprise.

There is a rising action that leads to a climax in your story.

A story can have a shift or ups and downs in various ways – every narrative should have at least one up or down, if not more.


The in the diagram above shows a gradual build-up in the story leading to a climax.

The shows a protagonist going through what starts as a routine day or a circumstance. However, a surprise or a shocking situation arises, or a bad guy shows up, leading to the dip. He or she recovers, and life goes back to normal. In the process, though, the protagonist has a new perspective or mindset from the story’s experience.

A in the diagram can be a positive or negative emotion that a protagonist goes through in your account. Life could be going okay, and then an event leads to a significant spike. While figuring the way around, they find that emotion to be way down towards the story’s end. Is the protagonist happier or sadder at the end of the story? It can be either way, depending on your story account.

These are just three examples; the variations can be in any pattern for your story. The takeaway here is that your storyline plot should have ups and downs to pull in the audience. What is the shift for the protagonist in your story?


How Do You Craft and Deliver an Effective Story?


When you are working on your story, write down your thoughts. It can be your first cut at the story as it flowed for you intuitively, or your notes compiled as a series of bullet points, or any other way that ideas emerge.

Write it down without worrying about the final structure and flow.

Keep an open mind in the early phase of your story development. Let the juices flow and ideas emerge for you.

Once you have it, take a step back and think about your story using the following steps.


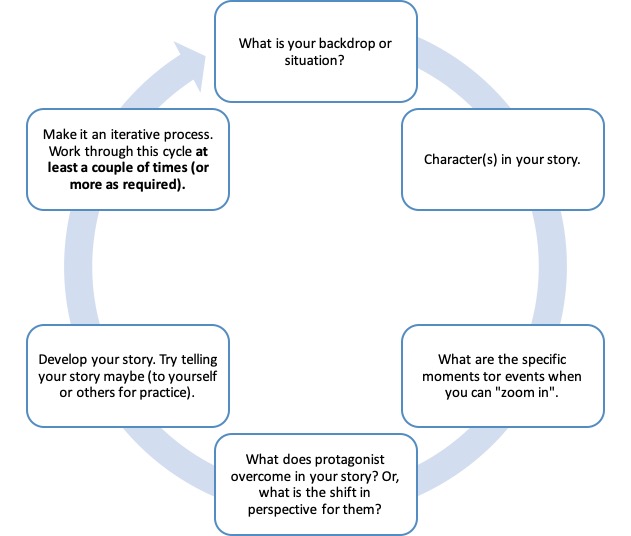
STEP # 1: A story has a situation, or a context, or a backdrop. What is that in your account?

STEP # 2: Identify the character(s) you want to include in your story.

  • If it is your personal story, you are one of the characters in it.
  • Or else, characters can be other people.

STEP # 3: The protagonist in the story overcomes something or someone or has a shift in perspective. It changes them in some way. What is that in your account?

  • If it is a personal story, it is you that changes. How did the story change you?
  • The protagonist in your story can also be someone else. In that case, how did he or she change from inside in your account? What is the impact of that to you personally, or what makes it an intriguing story to tell for you?

STEP # 4: Story should have a shift, a variation, a twist, or a surprise.

There is a rising action that leads to a climax in your story.

A story has a shift or ups and downs in a variety of ways – every story should have at least one up or down, if not more

The in the diagram above shows a gradual build-up in the story leading to a climax.

The shows a protagonist going through what starts as a routine day or a circumstance. However, a surprise or a shocking situation arises, or a bad guy shows up leading to the dip. He or she recovers, and life goes back to normal. In the process, though, the protagonist has a new perspective or mindset from the experience of the story.

A in the diagram can be a positive or negative emotion that a protagonist goes through in your account. Life could be going okay, and then an event leads to a significant spike, while figuring the way around, they find that emotion to be way down towards the end of the story. Is the protagonist happier or sadder at the end of the story? It can be either way, depending on your story account.

NOTE: These are just three examples; the variations can be in any pattern for your story. The takeaway here is that your storyline plot should have ups and downs to pull in the audience.

STEP # 5: A story should have events or specific moments that move it forward.

What are specific moments or experiences or incidences that have made a strong impression on you?

Zoom in to those moments while developing your story. “Take” your audience there, make them feel, and see and hear what you did in those instances.

Three steps:

  1. Think about it and select these moments to share.
  2. Develop each of these using vivid descriptive language, or dialogs, or specific details, etc.
  3. Practice delivery of these zoom-in moments. Invite your audience in, let them see and feel what you experienced emotionally. The practice is critical to your success with it.

Is your story about someone else? Is it derived from a book or a movie? If so:

  • Which is (are) the character(s) that appealed to you the most? Develop a story from their perspective.
  • You can and probably will have an entirely different perspective and message than others, even if you got the inspiration for your story from the same book, movie, or a current event.

STEP # 6: Develop your narration or plot, stringing together the events you captured in step # 5.

Use at least a couple of iterations of steps # 2-6 to refine your story. Sometimes, when you try to tell your story, ideas can galvanize for you as well. Use our regular meeting to practice it once maybe, and use that to go back and revise the story.

The process to craft your story – work through this cycle a few times to refine your story

STEP # 7: Practice delivery of zoom-in moments.

Use your vocal variety, facial expressions, and body language when you speak. The use of dialogs, vivid descriptive details, etc. can make a huge difference when you slow it down and let your audience feel those.

The practicing is critical to your success with it—PRACTICE, PRACTICE, PRACTICE.


Click here to download a printable (.PDF) version of this (opens in a new window or tab).


Finding Speech Topics

While speaking for the topic that resonates with you makes it fun, sometimes it can be a challenge finding speech topic.

“What do I talk about in my speech?”

Some questions for yourself while looking for a speech topic:

  • What did you enjoy doing over past six months or a year? Maybe an activity at school, something with your friends, or some other activity? That can be a speech topic.
  • Did any of the current events you might have heard of intrigue you?
  • Any books or movies that you enjoyed watching? Pick one of those, and share how it made imprint on you.
  • What are you learning at school? What is your favorite subject? Maybe, there is something from there that is making it interesting for you. Talk about that.
  • Share your experiences and develop why you cherish them, or value them, or appreciate them, or maybe keep thinking about them for some reason. An experience here can be a vacation trip, or time with your friends or family, something at your school maybe, something from a sports activity, watching something on TV or YouTube, etc. anything.

Always bring your toastmasters notebook to the class. While listening to others or from conversations with friends, if a speech topic pops in your head, jot it down in your notebook. Over time, it can develop in to a nice speech bank for you that you can use when it’s time to prepare for your next speech.

This note has more ideas that can help you stir up the juices and figure ideas for speech topics. (Click to download. It opens in new tab).

About Use of Visual Slides

How do you plan to use visuals in your speech presentation?

First of all, when you see use of visuals in a Toastmasters project, keep in mind that a visual can also be a handout that you give to members in audience, or something to show (for example your science project where you might have built something), or a prop appropriate for your speech topic, or presentation slides you can develop using Power Point, or Key Note, or Google Slides.

Visuals don’t necessarily have to be presentations slides only that you show on a TV or a projector. Other ideas here can serve your purpose as well.

About the use of presentation slides that go with your speech, yes, there is a value in learning and trying those. That is, particularly when your speech project description calls out for it. In other cases, be careful not to overdo visual slides, or use them overly in variety of speech topics.

Why is that?

  1. Visual slides complicate your speech preparation. It can add time to your preparation.
  2. It makes your speech presentation more complicated as well, as you have to balance and coordinate use of visual slides with your delivery of the message.
  3. It can get in your way for developing other skills such as effective eye contact, use of body movement and facial expressions, developing more vocal variety, etc. All these skills are very important to learn as well.

Visual slides shouldn’t be used as your speech notes. Might as well bring handwritten flash cards in that case.

So, again learning how to use visual slides is important, however only for a few select projects at toastmasters.

See more notes in the step # 3 of our speech preparation tool framework. This is a .PDF that opens in a new window. Go to STEP # 3 in that document, you will see notes on visuals in that section (click here).

Also, this blog post has a few other ideas about how to select what to show in your visual slides(click here).

Gestures and Body Language

When you speak, your gestures and body language can empower you to emphasize and clarify your words. Body language can help you reinforce sincerity and enthusiasm.

Where do you start?

  1. Keep our three techniques in mind: 1) develop a message in your own words rather than memorizing the entire speech or reading it, 2) focus on individual listeners for eye contact, 3) think of at least a few words in your address that you emphasize using the vocal variety. See more on these with this blog post on three techniques (click here.) With time, these three things will help you connect with your audience naturally, and your body language will also emerge naturally.
  2. Put verbs into action when speaking to an audience by physically acting them out with your hands, your face, or your entire body. Plan a few gestures using preparation and practice. See ideas and tips on this in the following video.
  3. Move around the speaking area when you transition from one point to the other in your presentation. Move towards the audience when asking questions, making critical connections, or offering a revelation or a key takeaway from your speech.


Be aware of nervous expressions such as putting hands in your pockets, nodding your head excessively, using filler words like um and ah too often, pacing back and forth, or rocking from one side to the other. Learn to control these mannerisms. They can distract your audience and sap energy from your presentation. Ask your friends and coaches to give you feedback when they see those from you.

Another potent tool is recording your speech and watching it later. Please have a friend record your presentation, and then watch it at home. If you’d like, ask your coach if there is time to watch the video in class.

Food for thought:

  • Prepare and practice. Think of five verbs in your speech that you can put into action using gestures and body language, visualize yourself using them, and rehearse them at home.
  • Use the feedback loop of toastmasters; it can make a big difference. After all, you have your peers and friends in the same boat; you aren’t into this alone. Use that to your advantage.
  • Go on your cutting edge; no one is judging you at toastmasters. Try new ideas, and experiment with them. Over time you will develop your natural style.

Most important of all, have fun with it. Enjoy the process.

When can I start toastmasters? How does it work?

Q1: What is this program?

A: See our home page to learn more about it (click here)


Q2: Is there any cost to join the program?

A: There is no cost to join the program. However, it requires a firm commitment to attend all scheduled classes.


Q3: How many new member teenagers (students) are added to the program annually?

A: It depends on the available coaching bandwidth. While there is no fixed number, we have typically been able to add new teenagers to the program every year.

The Toastmasters classes run in a workshop format, with everyone having a role each week and focusing on various communication skills from one week to the next. That limits the number of teenagers we can have in one group (class). We have been able to scale the program thanks to coaching volunteers, which allow us to add more groups.

We welcome new teenagers and families. We look forward to the new ideas, new energy, enthusiasm, fresh perspective, and colors that every new teenager brings. It enriches the experience of everyone in the program.

So far, we have taken all interested families in the program (sometimes with a little bit of wait time).

Notes:

  • If you have done Toastmasters in previous years, you will be a returning member. We have your contact info and send invites at the start of every quarter. Please skip Q2-5 and go straight to Q6. Thank you for your continuing interest in Toastmasters.


Q4: What is the starting age for Toastmasters?

A: The starting age for the Toastmasters youth program is 13 years. We give older teenagers priority. For example, a 14-year-old should get a first chance before a 13-year-old.


Q5: How do you register for Toastmasters?

A: Please submit the form on our contact page (click here).


Q6: What if we don’t make a list this quarter?

A: We keep you on a future list. We handle requests on a first-come, first-served basis. If you had to wait, your priority at the next opportunity would go up, as your request date would be that much earlier.

Again, we have taken in all interested families in the program (sometimes with a little wait time). We hope to continue doing so unless demand becomes too overwhelming to handle.


Q7: What if you start Toastmasters at an older age? 

A: That is fine. We have several examples of teenagers starting at older ages, ranging from 14 to 17 years, who have done well. One advantage of joining when you are older is more maturity. It makes it easier for you to grasp and implement the ideas.

No need to think or worry that you will miss out on any part of the opportunity if you start at an older age.


Q8: Are we graduating from one class to the next while continuing the program?

A: Right now, all the groups are the same. We distribute the age group and experience level evenly across groups.

Your group probably will change from one quarter to the next, so you get exposure to different peers and coaches.

When we add new teenagers/families to the program doing Toastmasters for the first time, we try to keep them together in one group and bring them along for the first three months. After that, they merge with other ongoing groups. We mix the age group with this first-timers group and quarter as well.


Q9: When we get invited to enroll and start the program, what if we have other conflicting activities?

A: That is fine. In that case, let us know, and you will have a chance to secure a spot in a future quarter when we add new students to the program.

The program does require commitment and regular attendance. So, you are strongly encouraged to review everything you might have to decide whether this is something you can take on as an additional activity. We encourage and appreciate you reviewing the schedule before committing to sign up. It will help us help you maximize returns from the precious time you invest in this.


Q10: If you are returning (ongoing and not a first-timer to the program) family in the program, do you have to commit to and join Toastmasters every quarter?

A: From our experience, continuity helps. However, we understand you might have a lot going on as well. Therefore, we schedule Toastmasters classes for 8-10 weeks. If you have to skip a quarter and would like to resume from the next, that is fine.


Q11: When we decide to join for a particular quarter, why is it a requirement to commit to the schedule and attend classes regularly for that quarter? 

  • If you don’t attend classes regularly and participate actively, you dilute others’ experience. Families invest precious time in this, and we are very sensitive to not compromising their returns. It adds to coaches’ bandwidth demand to make it run smoothly.
  • It causes headaches for everyone involved in the program (other students, families, coaches).

We assume you looked at everything you might have going on with activities and your family calendar, reviewed the schedule carefully, and planned ahead of time so the published program would work for you.

We understand that things can happen. For example, what if you get sick, have a mishap during a sports activity, or face an unforeseen family emergency? The overall spirit of the engagement is that you plan to commit to and attend all classes, and you don’t have any known, planned conflicts.

Cultivate Empathy, Emotional Intelligence using Toastmasters

At toastmasters, we have tools to organize the message, to learn how to listen effectively, to cultivate empathy, emotional intelligence.

Speeches and evaluations can help us cultivate this all.

Deven’s thoughts on this are in this video. (He gave a speech at his club in Orange, Paul Revere Toastmasters, to record this video)


[Deven’s note: I wish I had recorded the evaluation I got from Rich on this speech. If I did, I think it would have been helpful to post it right after the presentation. (Some of you know Rich, he came to our meetings a few times and gave ideas, feedback on a variety of things.) My takeaway from him “Deven, if I could think of one way that you can improve, and I don’t know how to do that … it is the way you conduct yourself. When you show emotions, they don’t seem natural.” So, that is a perspective for me from his vantage point. Thinking about it, I don’t show a lot of emotions when I meet with people one-on-one. It’s not right or wrong; it’s the way I am. So, it is my opportunity to learn and show more emotions if I were to connect with Rich’s of the world. I think the most emotions that I express is while I am coaching at toastmasters. I enjoy it so much; it puts me in my element. Maybe, I carry it around everywhere I go, whatever that I do 🙂 We live and learn.

The title of my speech was Perspective. I aimed to weave that, in conclusion, to reinforce it. In the flow of the moment, I missed it.

I am happy that the message did come through … or in the spirit of this conversation, I should say … so I think … 🙂 ]


Our two tools for prepared speeches and evaluations:

Speech preparation framework (opens in new tab/window).

Summary guideline for giving evaluations (opens in new tab/window).


Feel free to provide feedback, ideas, your thoughts related to this topic in the comments section of this blog. We can learn so much from each other while talking about it.

A few links on Emotional Intelligence:

  1. Articles on Emotional Intelligence at Psychology Today
  2. Article from Daniel Goleman
  3. Where do you use emotional intelligence in the real world? The answer is probably everywhere. Here is one example I found by “googling” for emotional intelligence …>>